
Create a job, then give it a source
A job is four manifests in a folder. Studio writes them for you — and the first one you fill in is the source.
1. Objective
Goal
Create a job from the canvas, learn what that gesture writes on disk, then place a source in it and configure it. Along the way, tell archive from delete before you need the difference.
Keep one cumulative Studio project named studio-course, one manual workflow named first-workflow, and one job named first-job. Each lesson builds on the state saved by the previous one.
What a job is
A job is not a file — it is a folder holding four manifests, and it is only complete when all four exist.
| Manifest | Answers |
|---|---|
sources.yaml | Where does the data come from? |
transformations.yaml | What happens to it along the way? |
destinations.yaml | Where does it go? |
pipeline.yaml | Which source feeds which destination? |
You can write those four by hand, and hdrctl will run them. Studio offers the other route: you design on a canvas and it writes the same four files. Neither is more legitimate — they produce the same folder.
Prerequisites
- Hydra API started with
hdrctl serve. - Studio started from
Hydra/studiowithnpm run dev. - A workflow open in the editor.
2. Steps
01Create a job
Objective
Add a job to the project without leaving the canvas.
Actions
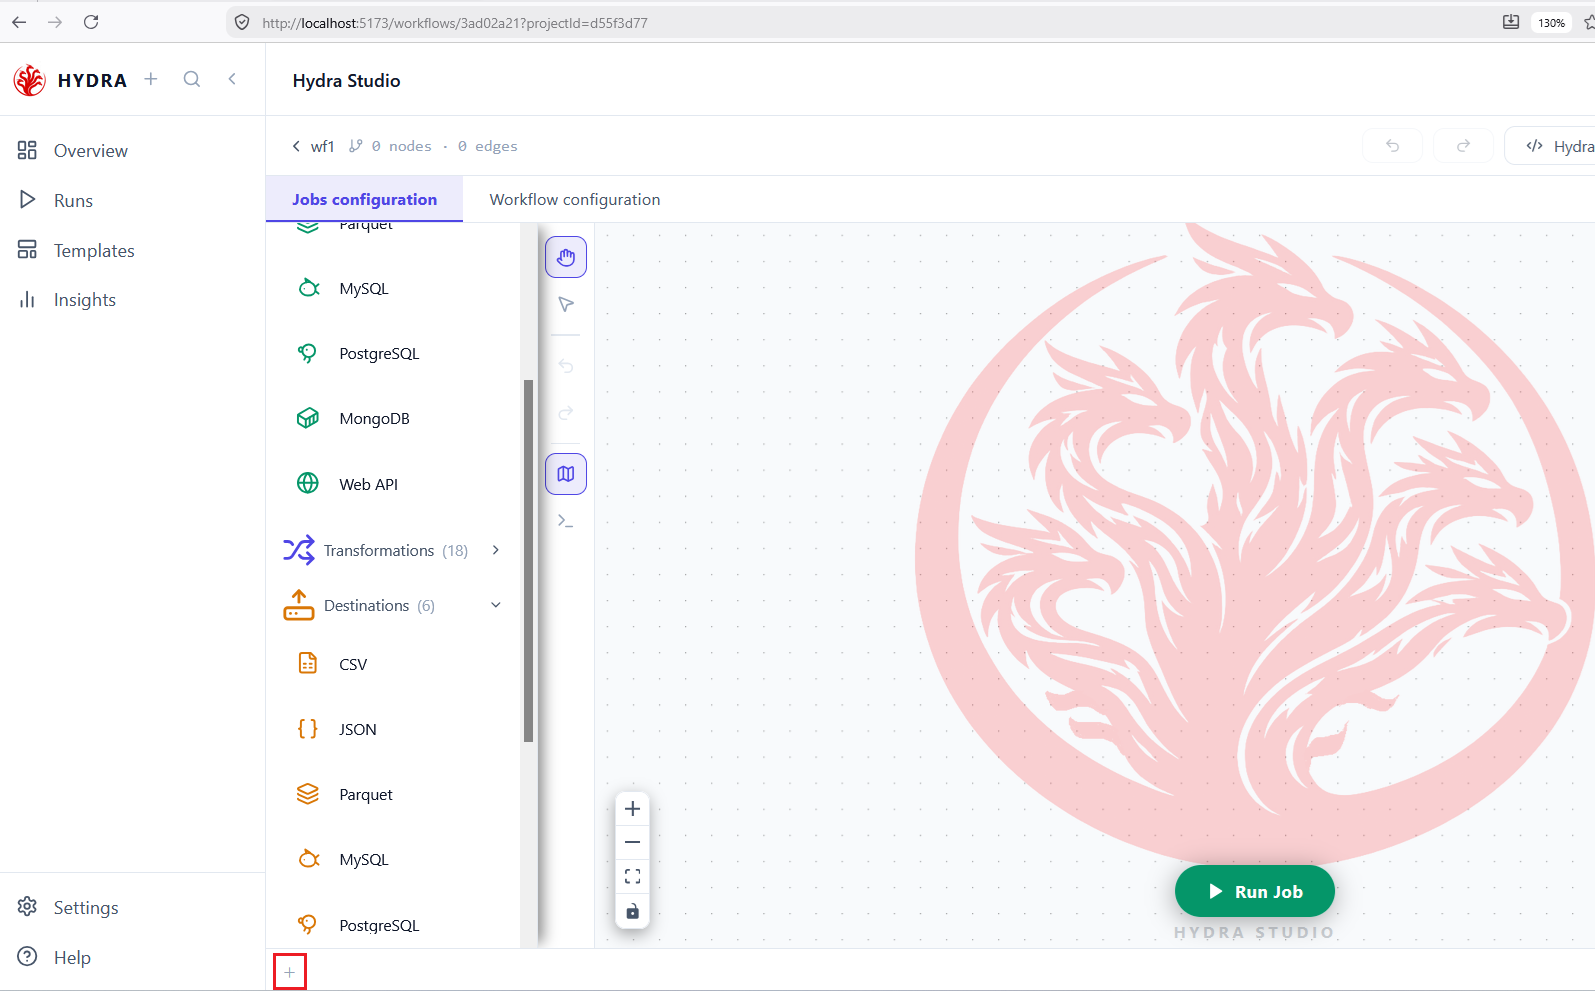
- Open the Jobs configuration tab.
- Find the + button at the bottom left of the scene.
- Select it, and name the job.
Jobs configuration → +
The button sits in the tab bar, under the palette. One press creates the folder and its four manifests, then opens an empty canvas for it. Nothing else is required — a job with no node is a valid, if idle, job.
A new tab beside the existing ones, already selected, and an empty canvas beside the source palette.
jobs/<name>/
  sources.yaml
  transformations.yaml
  destinations.yaml
  pipeline.yaml
02Add as many jobs as the work needs
Objective
See that a project holds a library of jobs, not a single one.
Actions
- Press + again to create a second job.
- Switch between the two tabs and note that each keeps its own canvas.
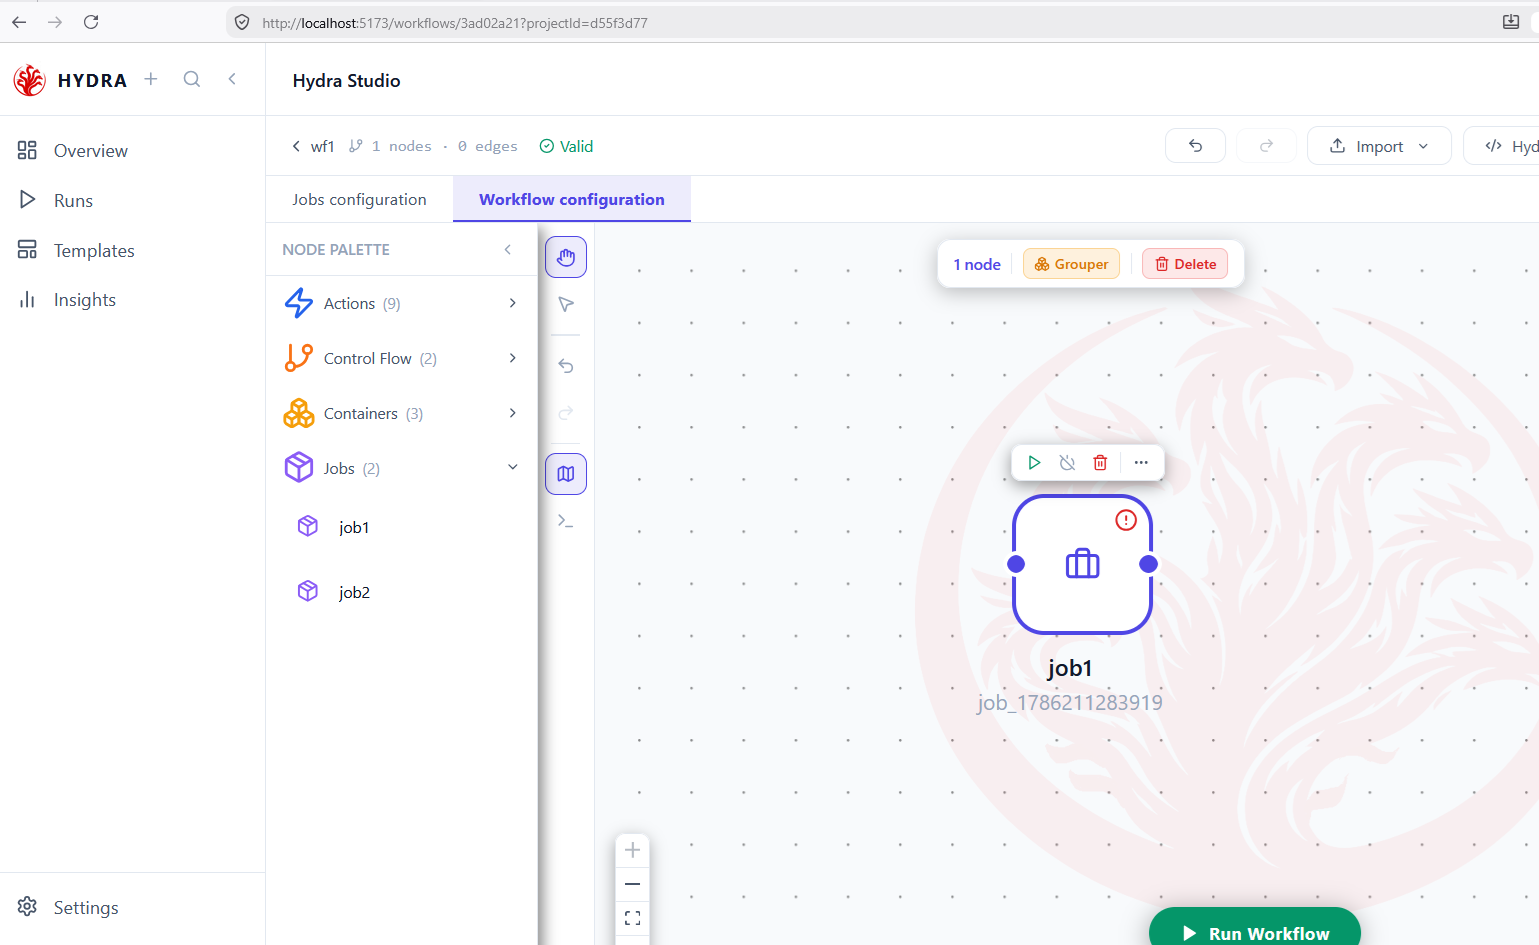
- Open Workflow configuration and expand Jobs in the palette.
Jobs configuration → + → Workflow configuration → Jobs
Each job is independent: its own folder, its own four manifests, its own canvas. What connects them is the workflow, and nothing else.
Every job you create joins the workflow palette by itself. You never register it anywhere — the Jobs category simply lists what the project contains. That is what makes a job reusable: design it once, orchestrate it in as many workflows as you like.
The count beside Jobs matches the number of tabs, and each job appears by name.
Jobs (2)
  job1
  job2
03Rename, archive or delete a job
Objective
Learn the three ways to dispose of a job, and which one is reversible.
Actions
- Right-click a job in the Jobs list of the palette, or in its tab.
- Read the three entries in the menu.
- Close the menu without choosing.
Jobs → right-click → Rename · Archive · Delete
Archive and Delete look alike and are not. This is the difference worth knowing before you need it.
| Action | What happens on disk | Reversible |
|---|---|---|
| Rename | The job takes a new name; its four manifests are untouched. | — |
| Archive | The folder is renamed <name>.backup. Every manifest survives. A second archive of the same name is timestamped, so nothing is ever overwritten. | Yes — rename the folder back. |
| Delete | The folder and its four manifests are removed. | No. |
A job still placed on the workflow canvas cannot be archived. Studio refuses and tells you to remove the node first — otherwise the workflow would point at a job that no longer answers to that name. Remove the node, then archive.
Three entries, Delete set apart below a separator and printed in red. The separator is the warning.
Rename
Archive
────────
Delete
04Enter a job from the workflow
Objective
Move from orchestration to design without hunting for a tab.
Actions
- Stay on Workflow configuration.
- Double-click a job node on the canvas.
- Read the breadcrumb once the scene has changed.
Workflow configuration → double-click a job node
Double-clicking a job node does not open a dialog — it takes you inside. The breadcrumb then reads the workflow, then the job, so you always know how deep you are.
The scene switches to Jobs configuration, on the job you double-clicked, with the source palette in place of the action palette.
wf1 / job1 1 nodes · 0 edges Valid
05Drop a source, and read its warning
Objective
Place a node, and learn what Studio says about a node it cannot use yet.
Actions
- Expand Sources in the palette.
- Drag CSV onto the canvas.
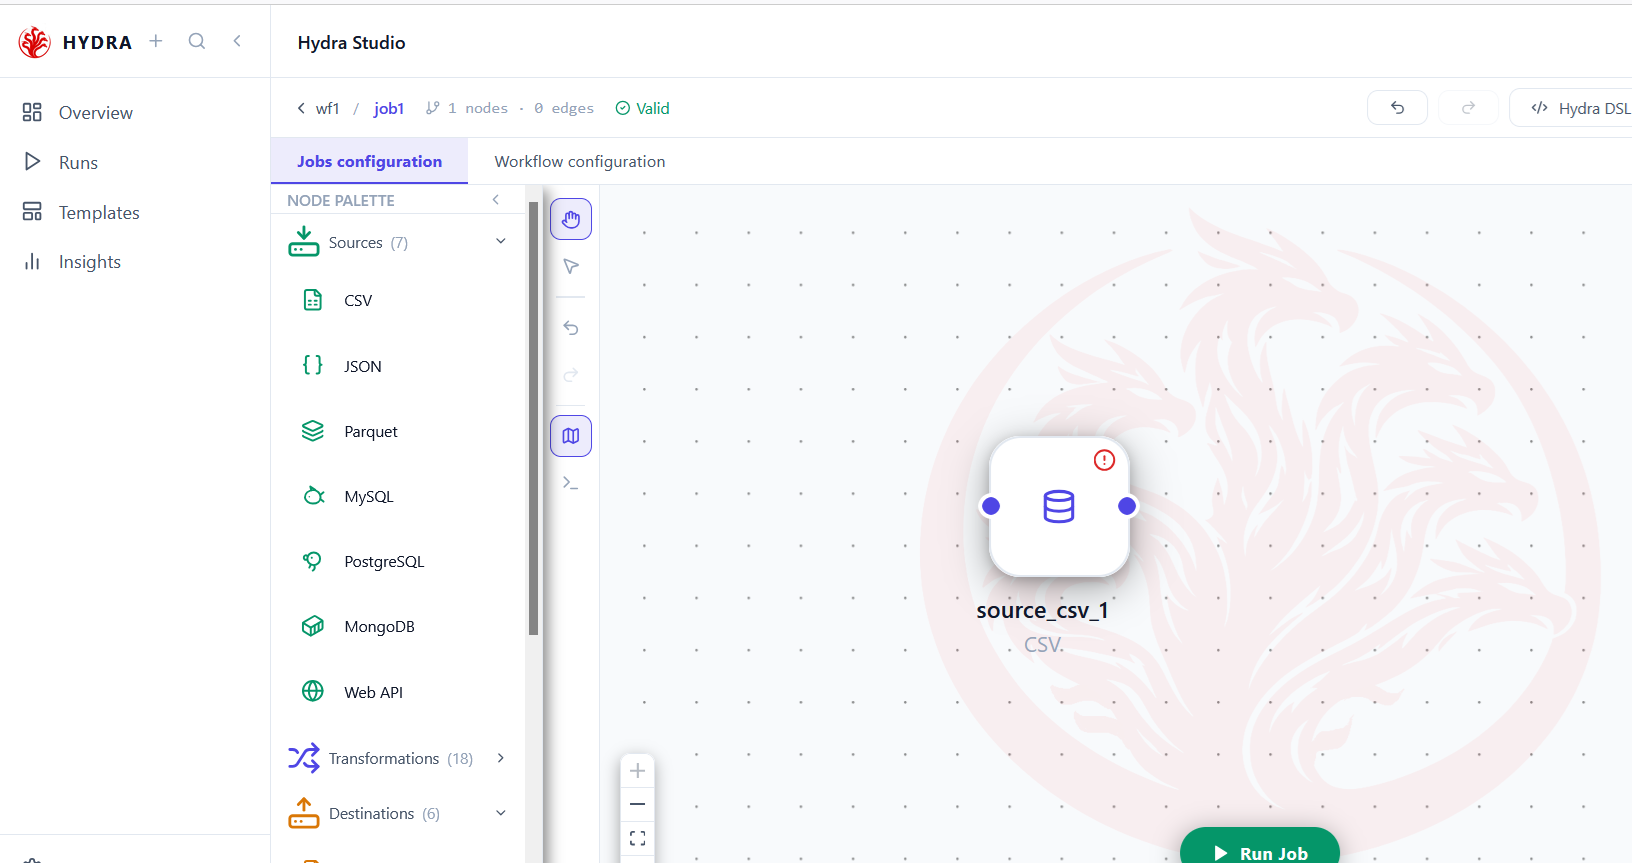
- Look at the top right corner of the node.
Sources → CSV → drag onto the canvas
A freshly dropped node carries a small red exclamation mark. It is not an error — it is an unanswered question. The node exists, its type is chosen, but the one thing it needs, a file to read, is still missing.
A node named after its type, with a badge in the corner. The badge disappears the moment the required field is filled.
source_csv_1
CSV   (!)
06Configure a file source
Objective
Answer the only question a CSV asks.
Actions
- Double-click the node.
- Fill File path, or use Browse to pick the file.
- Save, and watch the badge go.
double-click → File path → Save
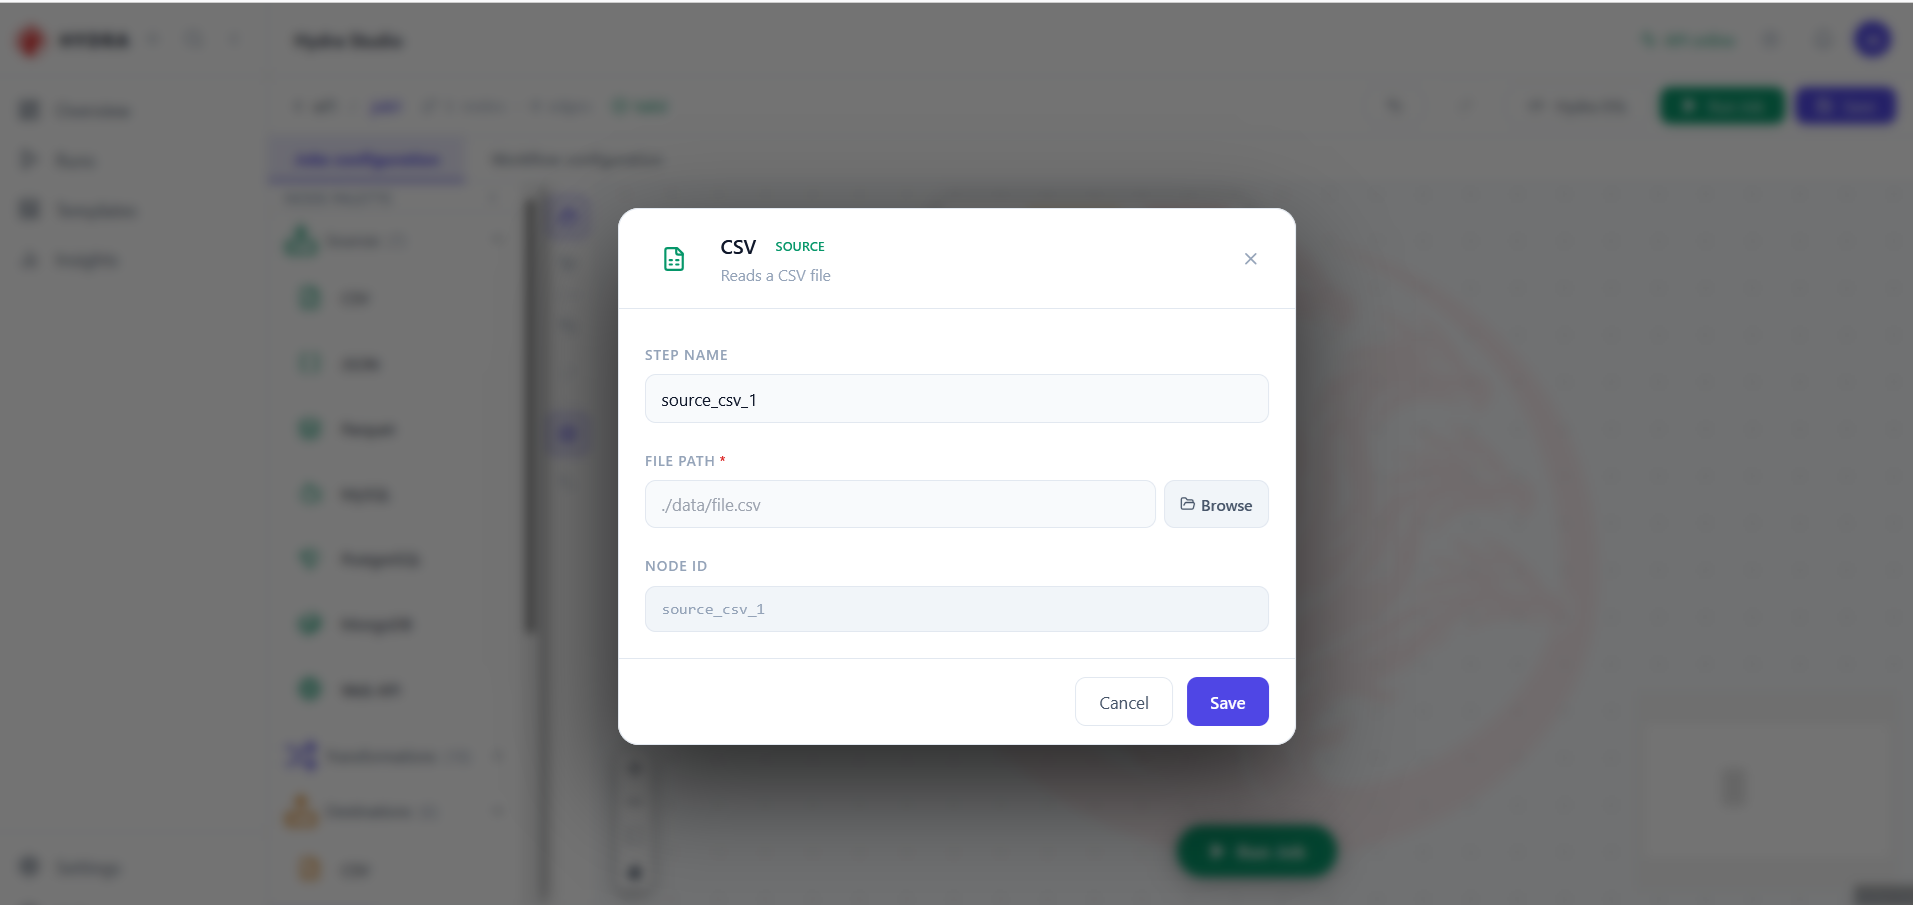
One required field, marked with a red asterisk. Prefer Browse to typing: it writes a path that exists, which removes the most common cause of a job failing on its first run.
The badge disappears and the node takes the step name you gave it. That name is the identifier pipeline.yaml will refer to.
CSV  SOURCE   Reads a CSV file
  STEP NAME   source_csv_1
  FILE PATH * ./data/file.csv
07Configure a database source
Objective
Read a connection form, and learn where a password belongs.
Actions
- Drag PostgreSQL, MySQL or MongoDB onto the canvas.
- Choose between Table and SQL query.
- Read the tip under the password field.
Sources → PostgreSQL → Table | SQL query
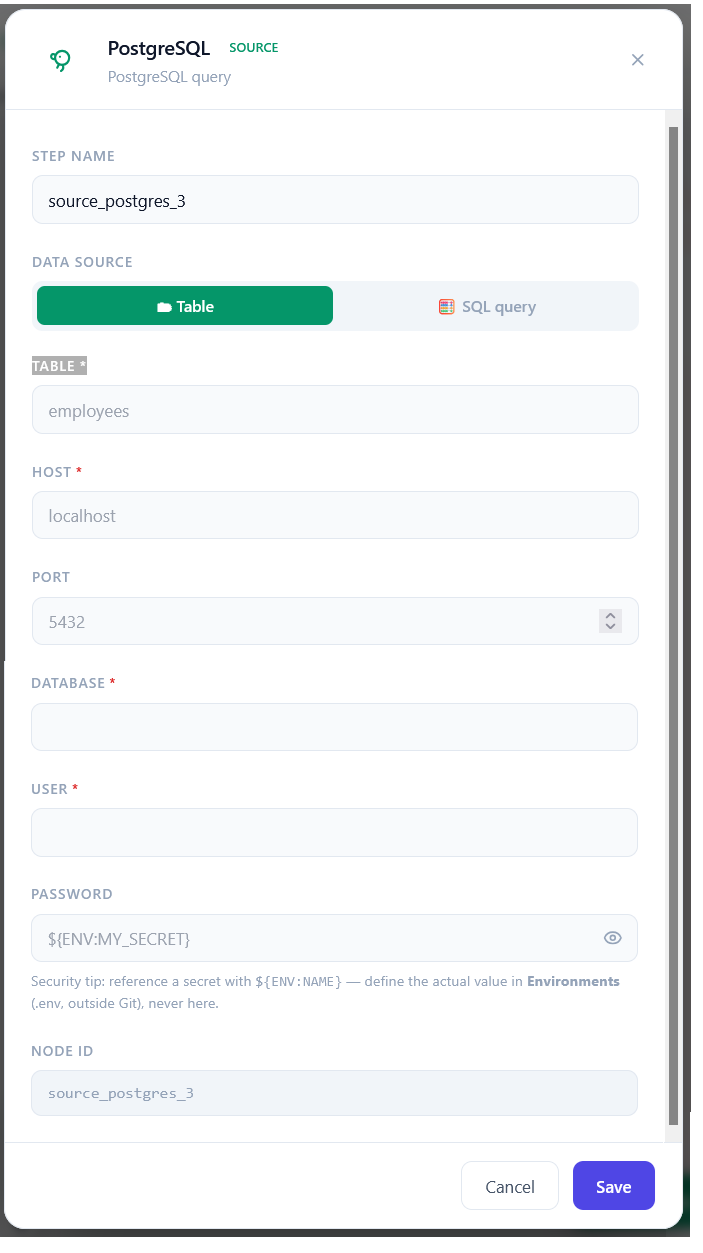
A database asks more than a file, and the first choice shapes the rest. Table reads a whole table. SQL query lets the server do the filtering and the joining before a single row reaches Hydra — usually the faster option on a large table.
Write ${ENV:MY_SECRET} instead, and define the real value under Environments, in a .env file kept out of Git. Studio says so under the field, and it is the one rule to respect without exception: a manifest is a file you commit, share and paste into a ticket.
Required fields marked with a red asterisk — the table, the host, the database and the user. The port is pre-filled with the usual value for that engine.
PostgreSQL  SOURCE   PostgreSQL query
  DATA SOURCE   Table | SQL query
  TABLE *  HOST *  PORT 5432  DATABASE *  USER *  PASSWORD
08Configure an HTTP source
Objective
Read from a service instead of a file or a table.
Actions
- Drag Web API onto the canvas.
- Enter the endpoint URL.
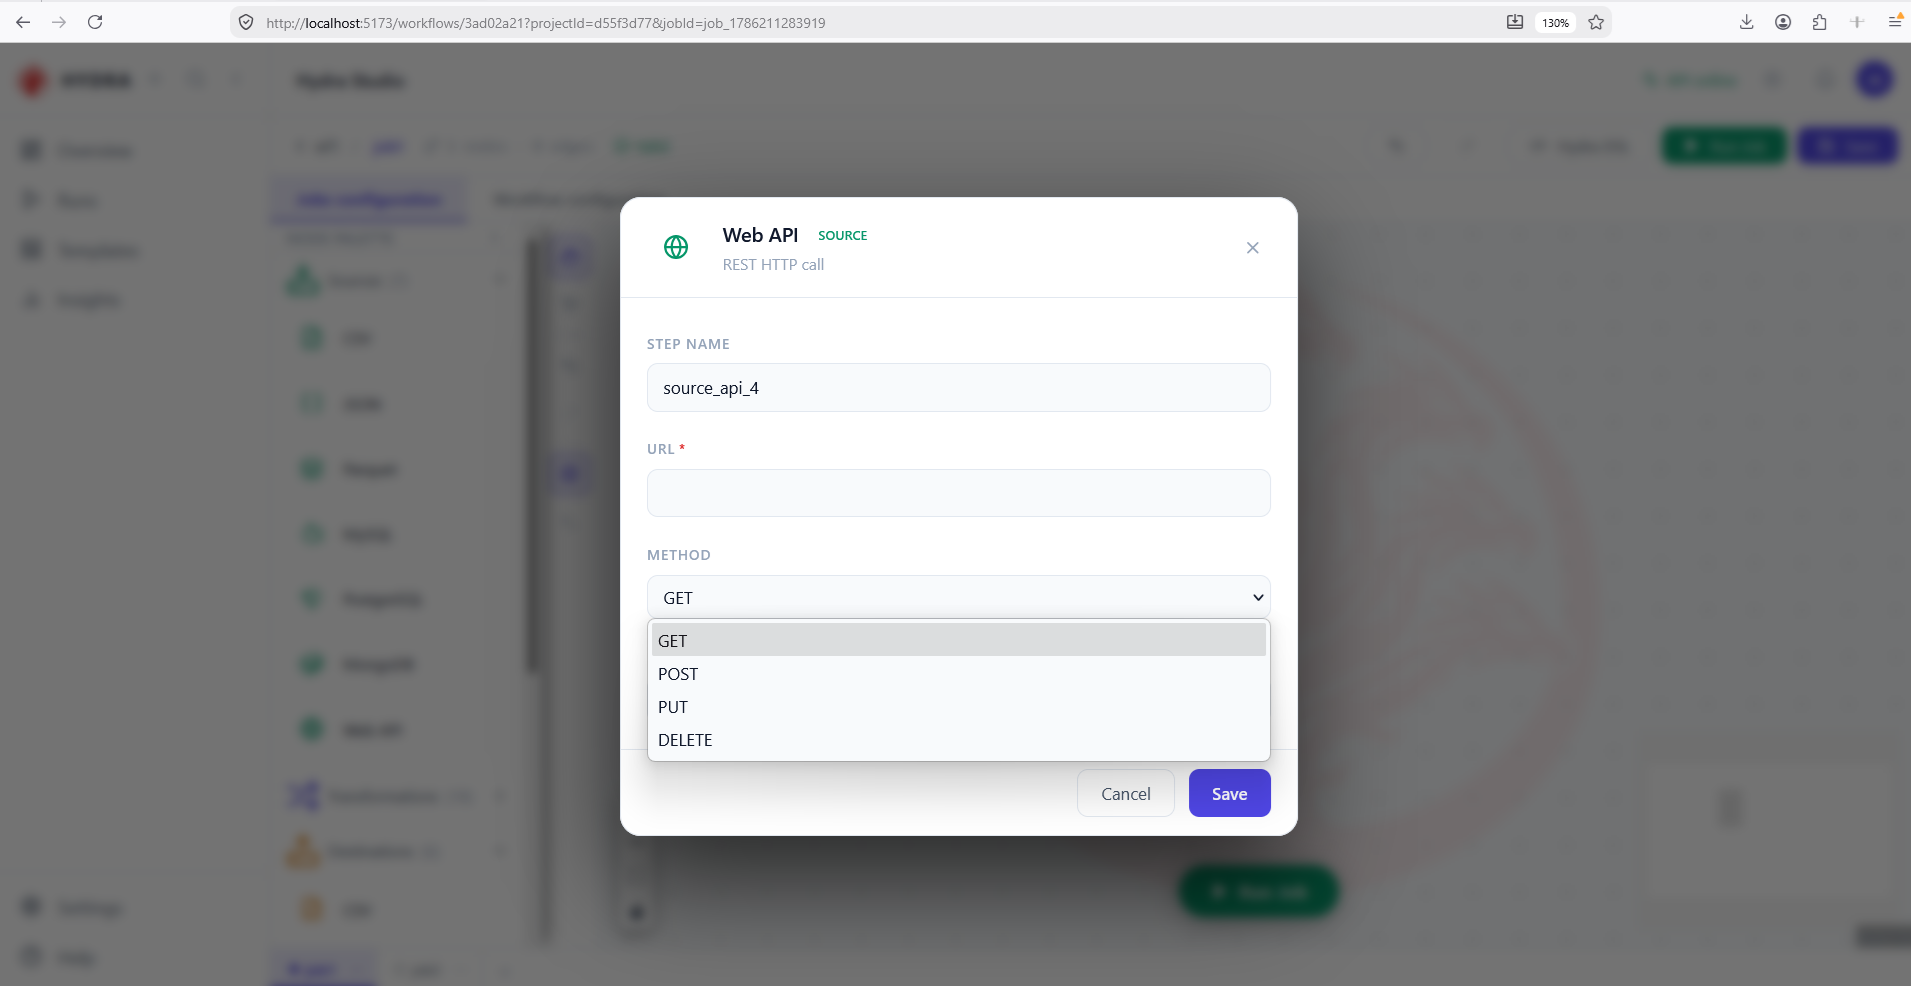
- Open the Method list and read the four verbs.
Sources → Web API → URL · Method
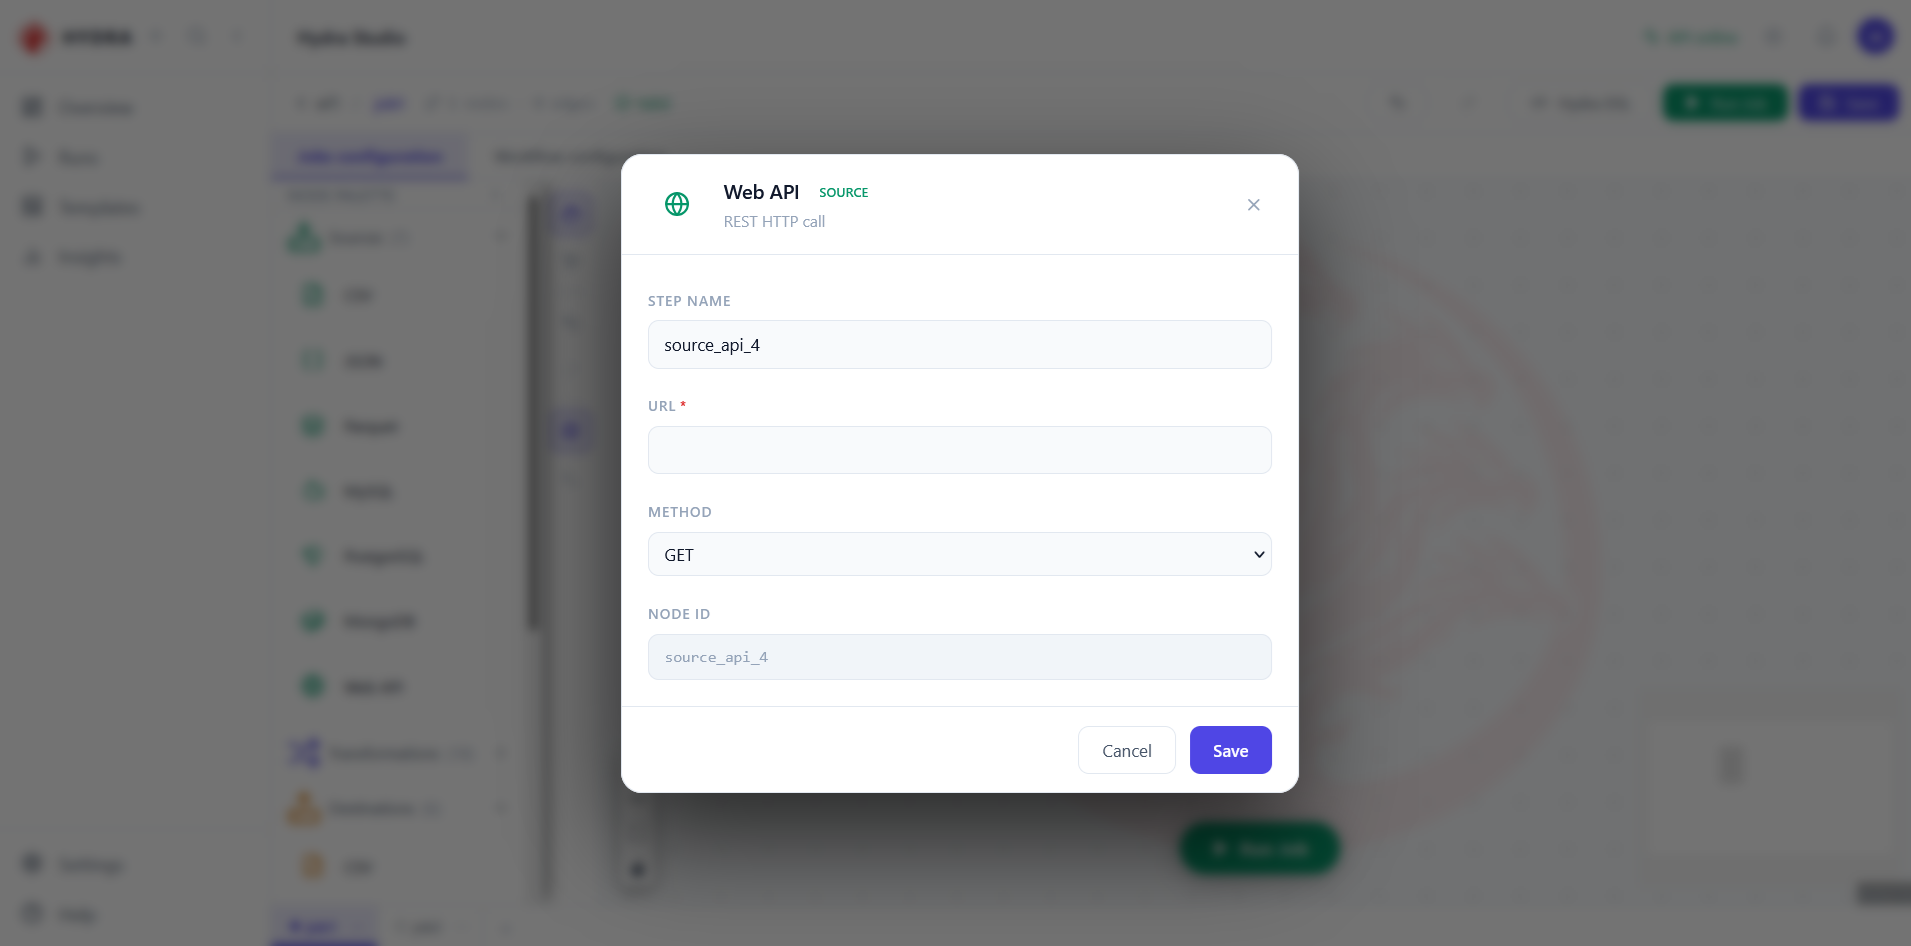
The URL is the only required field; the method defaults to GET, which is what reading normally means. The other three exist because some services expect a POST to return a result — a search endpoint taking its criteria in the body, for instance.
There is no HTTP destination in the palette. To send data out over HTTP, orchestrate a Webhook action in the workflow scene instead. Same protocol, opposite direction, different scene.
A short form, and a method list holding exactly four entries.
Web API  SOURCE   REST HTTP call
  URL *
  METHOD   GET  POST  PUT  DELETE
Tips and traps
Any job is four manifests in a folder. Studio writes them, hdrctl reads them.
A red badge means not configured, not broken. It clears as soon as the required field is filled.
Reach for Browse rather than typing a path. A path that exists cannot be misspelled.
A password never belongs in a node. Write ${ENV:NAME} and keep the value in Environments.
On a large table, prefer SQL query to Table. Filtering at the server saves rows Hydra never reads.
Archiving a job placed on a canvas is refused. Remove the node first, then archive.
An archive keeps the folder as .backup; a delete keeps nothing at all.
Double-clicking a job node changes scene. It does not open a dialog — look at the breadcrumb.
3. Checklist
| Verification | Expected result |
|---|---|
| Job creation | A tab appears, and a folder with four manifests |
| Workflow palette | Lists the job without any registration step |
| Job menu | Rename, Archive, then Delete below a separator |
| Fresh node | Carries a red badge until it is configured |
| CSV source | One required field: the file path |
| Database source | Table or SQL query, and a password written as ${ENV:NAME} |
| Web API source | A URL, and a method defaulting to GET |
4. Troubleshooting
| Symptom | Cause | Fix |
|---|---|---|
| No + button | You are in the workflow scene | Switch to Jobs configuration; the button is at the bottom left |
| The badge stays after saving | A required field is still empty | Reopen the node and look for the red asterisk |
| Archive is refused | The job is placed on the workflow canvas | Delete the node from the canvas, then archive |
| The job runs but reads nothing | The path is valid but the file is elsewhere | Reopen the source and use Browse |
| A password ended up in the manifest | The value was typed into the field | Replace it with ${ENV:NAME} and rotate the secret |
| No HTTP destination in the palette | Web API is a source only | Use the Webhook action in the workflow scene |
5. Next lesson
The job exists and knows where its data comes from. The next lesson places what comes after it: the transformations that reshape the data on its way through.